Ever wonder what happens to the cards you give? After they ooh and aah, and say thank you for the handmade card? If they're crafters like us, they display them for a while , then maybe put them in a box. If they're not crafty, the card we slaved over may even end up in the (gasp) garbage. (Just being honest here, not everyone keeps everything like we do).
And that's OK with me.
Really.
But for those really special birthdays, you know which ones I mean...the ones with a 0 on the end?
The ones that celebrate our 'experience'?
Those birthdays require more than 'just a card', those ones deserve some thought and reflection.
I am reflecting here because my little sister is turning 40 next week. My younger sister. When the hell did that happen? She's just a kid! That makes me.....oh crap, never mind. Back to my post...
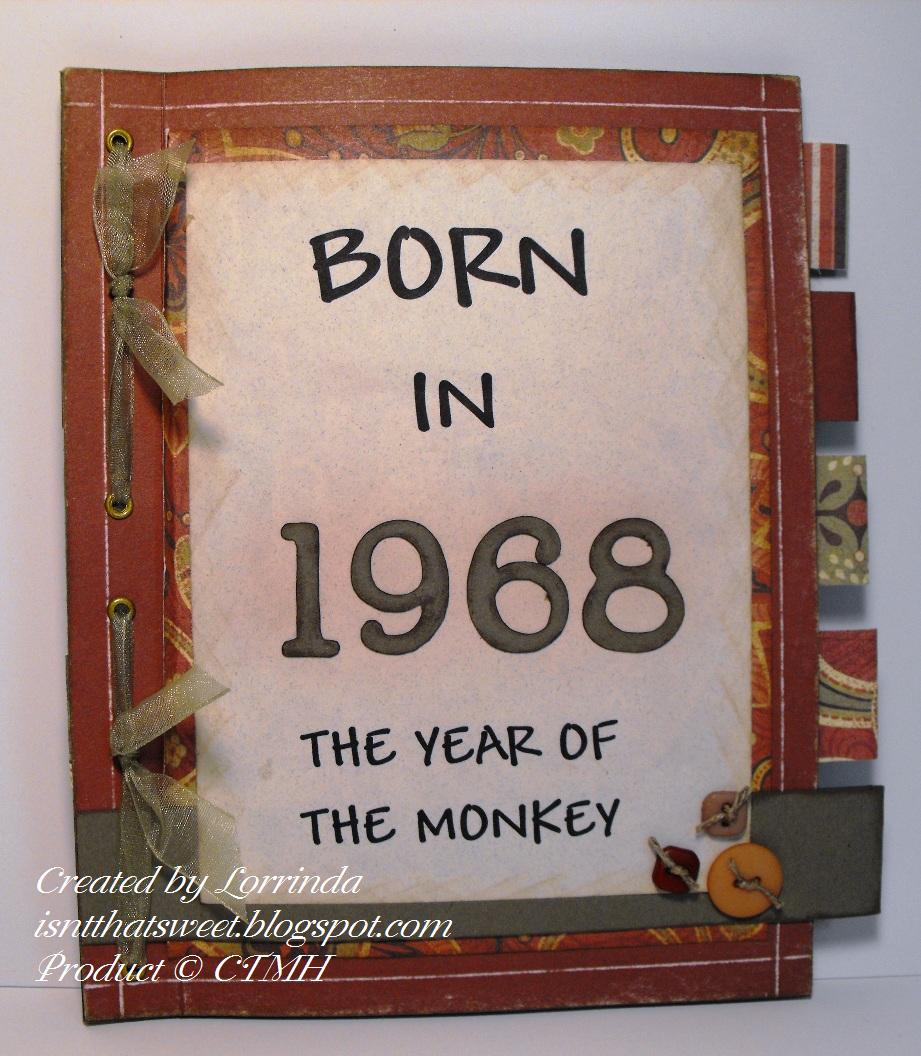
This card/book requires a little bit of research. You may even need to take a few notes, but I promise it is worth it for the reaction you'll get when they open this one. THIS card gets passed around for everyone to read. THIS card won't end up in the gabage. THIS card gets displayed in the family room. THIS card will get passed around the room at their retirement party. THIS card takes some time to make, so you may want to save it for someone you REALLY like.
You can click on the pictures below to get a larger detailed view if you want to read the text.
I have made a few of these now, and have had several requests for instructions. Since I couldn't share my little basket template with you earlier this week, I decided to do up a tutorial for you!
Read on if you're interested:
Warning, this first part is boring. Reminded me of school...hang in there, the creative part is up next!
First you need to do a bit of research to get the events of the year we are celebrating. In this case, my sister was born in 1970. Some great sites are
wikipedia and
the people's history, you may want to take some notes.
Then you need to compile your info into tidy little topics. For this card I chose astrology, economy, politics, science and technology, entertainment highlights, popular tv shows, movies and music, and famous people born in the same year. Other topics could be sports highlights, nobel prize winners, world events...whatever you want! Don't let me lose you here, those site links I gave you have all the info rather sorted for you already. It's really not that much work.
I organized these for printing using PrintShop 2, but Word would probably work too. Place 4 equal text boxes on your page, and place your info into these boxes. I needed 3 pages to contain all of mine. Don't forget to spell check! You don't want to find a typo after you've glued a piece down. Don't ask me how I know, just trust me. I saved mine into a file so I can find them again. (You never know when you may need this info again!) Then print them out and they should look roughly like this:

Now for the creative part! (if I haven't already lost you back at research)
You will need coordinating papers. I used CTMH papers from the Veranda Level 2 kit. I love these CTMH kits, perfectly coordinated colors, all the time. No guesswork. And they tell us which inks match. Almost makes it too easy!
I used:
2 colors of cardstock...A cut 2: 5 1/2 x 7"
B cut 3: 5 1/2 x 7"
3 coordinating patterned papers...cut 3 of each: 4 1/2 x 6"
Now, ink up all the edges for a nice distressed look. This card represents the 70's after all, that was DECADES ago! On the patterned papers you only need to ink up the front, but for the cs I suggest inking both sides since they will be visible front and back.
Score the all cs pieces at 1/2 inch along one long side to create an edge for binding. This is so the pages open easily, and lie nice and flat when open. You don't need a scoring board for this, I just use my bone folder in the track of my paper trimmer instead of the blade.
Now use up some of those patterned paper scraps to make tabs.
You'll need 5. I used a tab punch, but you can use circles or even paper strips.
Whatever strikes your fancy.
Organize the pages for your book in the order you want them. Now line up those tabs evenly along the cs pages before you glue them on. These tabs fit perfectly. I planned it that way...not. Sometimes I just luck out!
FYI, the tabs are 1 3/8" wide at the base.
WHO's puffy fingers are THOSE?
Once you have all your cs pages tabbed, it's time to trim the text blocks we made earlier. I rough cut the pages into 4 blocks, then trimmed them to measure 4 x 5 1/2 "
Now distress them too, and stamp a pattern on them if you want.
Now, adhere the text boxes to the patterned paper
in whatever order you prefer.
There are those bloated fingers again! How do they keep sneaking into MY pictures? I wish she would get a manicure like those crafty ladies on youtube...they look so pretty...
Then adhere the patterned layered peices onto the cardstock pages. It will look best if you center the mat between the score line and the opposite edge of the paper.
When all the pages are done, it's time to embellish!
Note: if using brads or anything that may show through the back, you may want to embellish the patterned pieces before you stick them down onto the cs to hide the hardware. Maybe I should have mentioned this with the last photo. Sorry!
Here's a tip if you stuck something down prematurely (or crookedly!) and need to get it off without tearing your paper, use waxed dental floss! It really works, even with my Scotch ATG gun. Just slide a long piece of floss between the corner of the pages stuck together. and work it back and forth through to the opposite side. (I'm a paid dental professional, trust me, floss fixes everything!!! It's my duct tape)
I used flowers, fancy brads, half pearls, coiled wire thingies, and antique looking hinges, all from CTMH.
To bind the edge, I used the pewter hinges. But you could use a cropadile to punch holes and attach eyelets to the first and last pages and tie a ribbon through. Use whatever you want!
At the end of this post are some other examples of Birthday Yearbook Cards that I have done differently.
This tutorial is just a simple guideline, and is easy to alter in any way you want! Change the sizes, use more or less pages, there's no wrong way here.
Now you may want a pretty way to package this up, since it won't fit into an ordinary envelope. I have used padded envelopes in the past, but this time I thought I'd make a custom box. Here's how I make mine:

That sticky note says: measure the item you want to put into the box. Determine the length and the width. I made mine bigger so I could include a half-fold letter. My measurements here are 8 1/2" x 6 1/4".
Now determine how deep you need your box to be. For this card I made it 1/2 inch deep. Add that 1/2 inch to all 4 sides, the math on this one made it 8.5+0.5+0.5 x 6.25+0.5+0.5 = 9 1/2" x 7 1/4".
Cut 2 pieces of cs this size (9 1/2 x 7 1/4"), one for the bottom and one for the top.
Now, score the 1st piece at 1/2 inch on all 4 sides. Score the 2nd one at just a hair less than 1/2 inch on all 4 sides. This is to be the top, and needs to be just a hair bigger then the bottom so it goes on and off easily.
Snip in with your scissors on the corners as shown in the photo to make the tabs to be folded in, assemble your box halves by using adhesive on the tabs. Check to make sure they fit together.
Did I lose you there? Just try it, all gift boxes are basically the same construction.
Feel free to decorate the top!
I also cut little slots into the sides to make opening easier, used a small circle punch:

Now package up your creation!
Happy Birthday Teri!
(Her birthday is on June11, so I better get this in the mail!)
I can post this now because she's out of the country...her hubby surprised her with a trip to Europe for her birthday, isn't he sweet? I'm pretty sure she won't be lurking on the internet while she's vacationing in Europe (without their kids ;)
Here are some other Birthday Yearbooks I have made in the past.
I know I made more, but I forgot to take pictures of some of them. Let this be a lesson, take pictures of everything, you never know when you'll need them...

These may seem like alot of work, but you only have to make them once. Birth years don't change! Eventually everyone in my family will have one.
I hope I didn't bore you with this very long tutorial!
Thanks for visiting my blog,
Lorrinda